Hostas are some of the easiest plants to multiply in a shade garden. Dig up a clump, cut it into sections, and put those sections back at the same depth. It can feel a little mean the first time you cut through one, but these are incredibly resilient plants.
We have more than 30 hosta cultivars in our garden, and occasionally I divide one because it has become crowded. Other times, a perfectly healthy plant is getting hidden behind its neighbors and needs moving. And sometimes I simply want more of a variety I really like.
There are two ways I go about it: lifting the entire clump so I can see exactly where to cut, or taking a piece directly out of the ground while leaving the rest in place. The important decisions are when to do it, how small to make the divisions, and where those new plants are going.
What You'll Learn
- Divide hostas in early spring as shoots emerge, preferably when the soil is moist.
- Use larger divisions for garden planting and smaller rooted pieces for growing in containers.
- Replant every division at its original depth rather than burying the crown to support it.
- Remove part of a clump in place when you do not need to move the entire plant.
Table of Contents
- When Should You Divide Hostas?
- Gather Your Tools Before Digging
- Method 1: Lift and Divide the Whole Hosta
- How Small Can a Hosta Division Be?
- Replant Hostas at Their Original Depth
- Method 2: Divide a Hosta Without Lifting the Whole Clump
- Choosing a Home for Your New Hostas
When Should You Divide Hostas?
Early spring, as hostas emerge from their winter sleep, is my favorite time to divide them. You can see where the new shoots are coming up, and the plants have not yet developed their full canopy of leaves. Fall is another opportunity.
Try to work after rain has moistened the soil. If it has been dry, water the hosta a couple of days before digging. That makes the shovel easier to get into the ground, and a well-watered plant starts the process under less stress.
Do not assume every hosta needs dividing just because spring has arrived. A newer clump that is growing well can stay right where it is.
Reasons to divide a clump
- It has become crowded. Over four, five, or six growing seasons, a clump can become increasingly dense. Smaller leaves or fewer flowers may be clues that it is time to consider division.
- You want more plants. Some newer cultivars are expensive. Letting one establish and then dividing it can give you several plants without buying each one separately.
- It needs a better location. In a densely planted garden like ours, neighboring plants can grow over a hosta. If I am digging it up to move it anyway, I may divide it at the same time.
- You want to share a favorite. Hostas are easy plants to pass along to friends.
The plant's condition matters more than a rigid calendar. For additional background on their growing requirements, the University of Minnesota Extension has a useful guide to growing hostas.
Gather Your Tools Before Digging
You do not need much specialized equipment. I use a narrow trenching shovel to lift the plant and a folding pruning saw to cut the clump apart.
- A shovel for digging around and beneath the root ball
- A clean cutting tool, such as a pruning saw, hori-hori knife, or sharp-edged trowel
- An empty container for carrying the lifted plant
- Containers and well-drained potting mix if you plan to pot up small divisions
- Water for settling the plants in afterward
A knife can also work. The main thing is to use a clean tool that lets you make a controlled cut through the crown and roots.
Have your work area ready before lifting the plant. Hostas are tough, but that does not mean you should leave one sitting on a sunny driveway for four hours with its roots exposed. The foliage can dry out quickly. Knock off enough soil to make the clump manageable, then get on with dividing and replanting it.
Method 1: Lift and Divide the Whole Hosta
1. Dig a circle around the plant
For the clump I am moving, I start about eight inches out from the base. That is a starting point for this plant, not a required distance for every hosta.
Work the shovel around the entire clump, loosening it a little more with each insertion. I like a trenching shovel because its narrow blade is easy to work into a planted bed.
If the root ball will not lift, find out what is still holding it rather than simply pulling harder on the foliage. In our garden, tree roots are often the holdup. One root wrapped through the clump was enough to keep this plant attached after the surrounding soil was loose.
2. Lift it and remove some soil
Once the clump is free, lift it out and gently knock some of the loose soil back into the hole. You do not need to remove every bit of soil or turn it into a completely bare-root plant.
I set the clump in an empty nursery container to carry it to my work surface. That keeps the root ball contained and makes the whole job easier to manage.
3. Decide how many divisions you actually want
The size of each division depends on whether it is going into a container or straight back into the garden. This is the decision I make before cutting.
A clump with nine shoots could become three garden plants with roughly three shoots each. In a nursery setting, I might be much greedier and turn that same plant into eight or nine small container plants.
Those are different goals. One gives you a useful garden display now. The other gives you the greatest number of plants to grow on.
4. Find a gap and cut through the crown
Look between the groups of shoots for a natural place to make your cut. An outer shoot sticking away from the main clump is often an easy place to start.
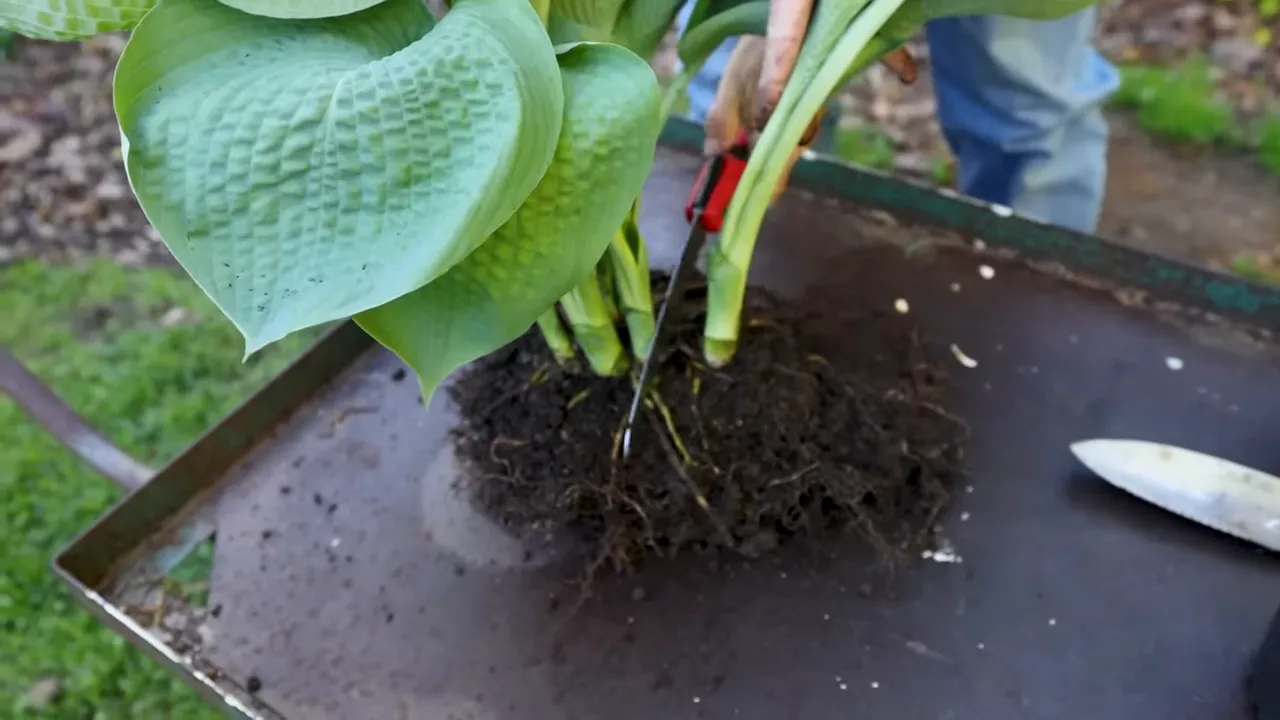
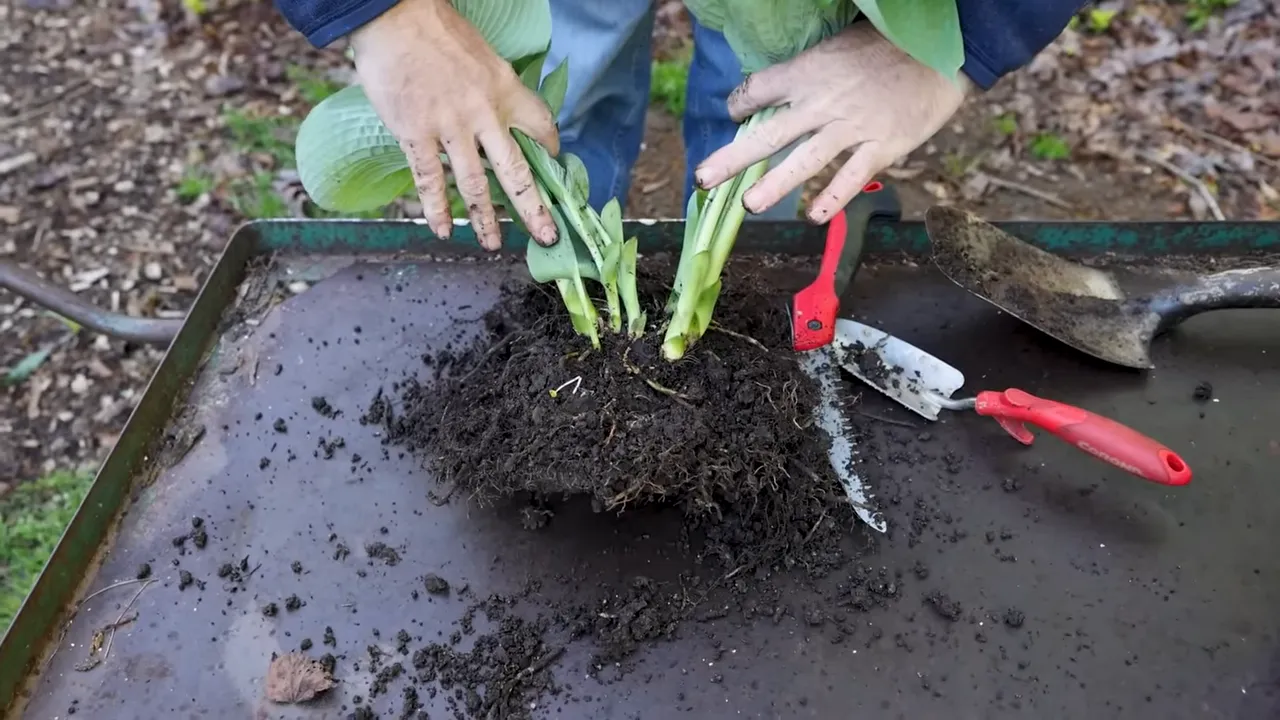
Cut down through the crown and root mass, keeping roots attached to the shoot or group of shoots you are removing. A loose leaf or stem by itself is not the division you are after.
For this plant, I remove one small rooted section for a container, then split the remaining clump into two larger pieces for the garden. There is no need to make every piece identical.
How Small Can a Hosta Division Be?
You can get pretty daggone greedy with hostas when you are growing the pieces in containers. But smaller is not always better.
Small divisions for containers
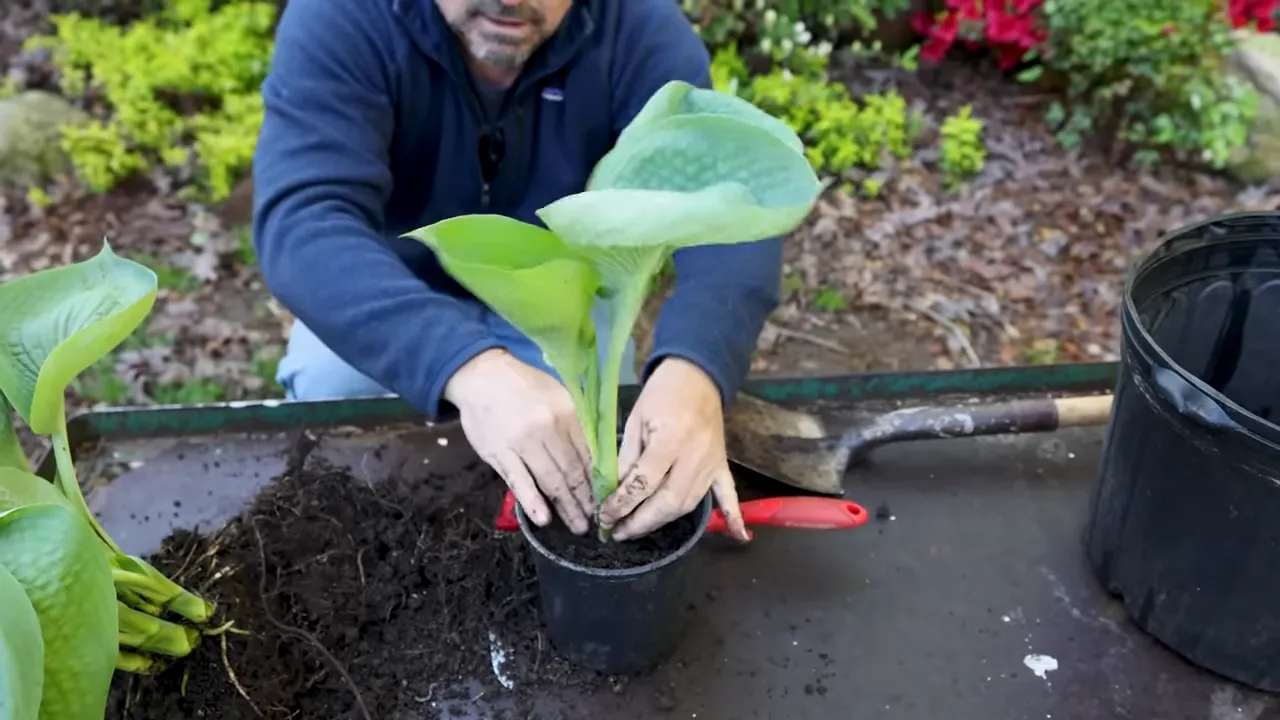
A single shoot with a piece of crown and attached roots can be enough to grow on in a pot. I use a one-gallon container filled with potting mix for the small section I remove.
In a container, I can control the water more closely and use a well-drained growing medium. That controlled situation makes it practical to work with much smaller divisions.
I would not expect a single-shoot division to immediately produce a whole bunch of additional shoots that same season. I would generally grow it through the year, let it go dormant over winter, and assess it when it returns the following spring. By then, it may have several shoots and make a much fuller plant.
That was useful in the nursery business: a small piece could become a saleable container plant after growing on. For a home gardener, it is simply an economical way to build up a collection.
Larger divisions for the garden
When a division is going straight into the ground, I leave it larger. Roughly three shoots can make a useful section, although vigor matters too. Two strong shoots may make a perfectly good division, and leaving five or six together gives you a bigger display this year.
Tiny pieces can survive in the garden, but they are more sensitive to the conditions around them. Too much rain, too little water, and rotting are bigger concerns when there is very little plant material to work with.
The more pieces you make, the smaller each plant's display will be this season. If your goal is an attractive bed now, resist the urge to turn every shoot into a separate plant.
Replant Hostas at Their Original Depth
This is the rule I keep coming back to: whatever was exposed before division should remain exposed after replanting.
You have a handy guide because you can see where the plant was growing in the soil. Put it back at that same level, whether it is going into a pot or into the ground.
Potting up a division
Make room for the roots in the potting mix, set the division at its original depth, and gently firm the mix around it.
It is tempting to pile soil around the collar to make a tall division stand straight. Do not bury it deeper just to prop it up. A little leaning is not a big deal. As the roots grow into the surrounding mix, the plant will become better anchored.
Planting a division in the garden
Dig a hole that accommodates the roots without setting the crown too deep. Place the division, check its height, and backfill around it. If it settles below its former soil level, lift and adjust it before finishing.
Gently firm the soil without overcompacting it. Then water the plant well.
Our planting area has had compost added and mulch breaking down over several years, so I am working in an already prepared bed. There are also plenty of roots from the neighbor's maple, but the established hostas here have competed well in those conditions.
I will mulch around the replanted divisions as part of our regular bed maintenance. The soil has already been fertilized for the season, so I am not adding another round of fertilizer just because I divided a plant.
Method 2: Divide a Hosta Without Lifting the Whole Clump
The full-lift method makes it easy to inspect a plant and decide where to cut. But the technique I actually used a lot at the nursery was simpler: leave part of the hosta in the ground and remove only the portion you need.
I call it dividing in place.
- Choose the portion to remove. Look at the emerging shoots and identify a section you can separate from the rest.
- Cut down through the clump with the shovel. In this example, I cut through the middle to separate about half the plant.
- Dig around the outside of that section. Loosen the roots beneath the portion you are removing while leaving the other portion planted.
- Lift out the separated piece. Check for tree roots if it does not come free.
- Backfill the opening. Knock some loose soil from the removed root ball back into the hole and fill around the remaining plant.
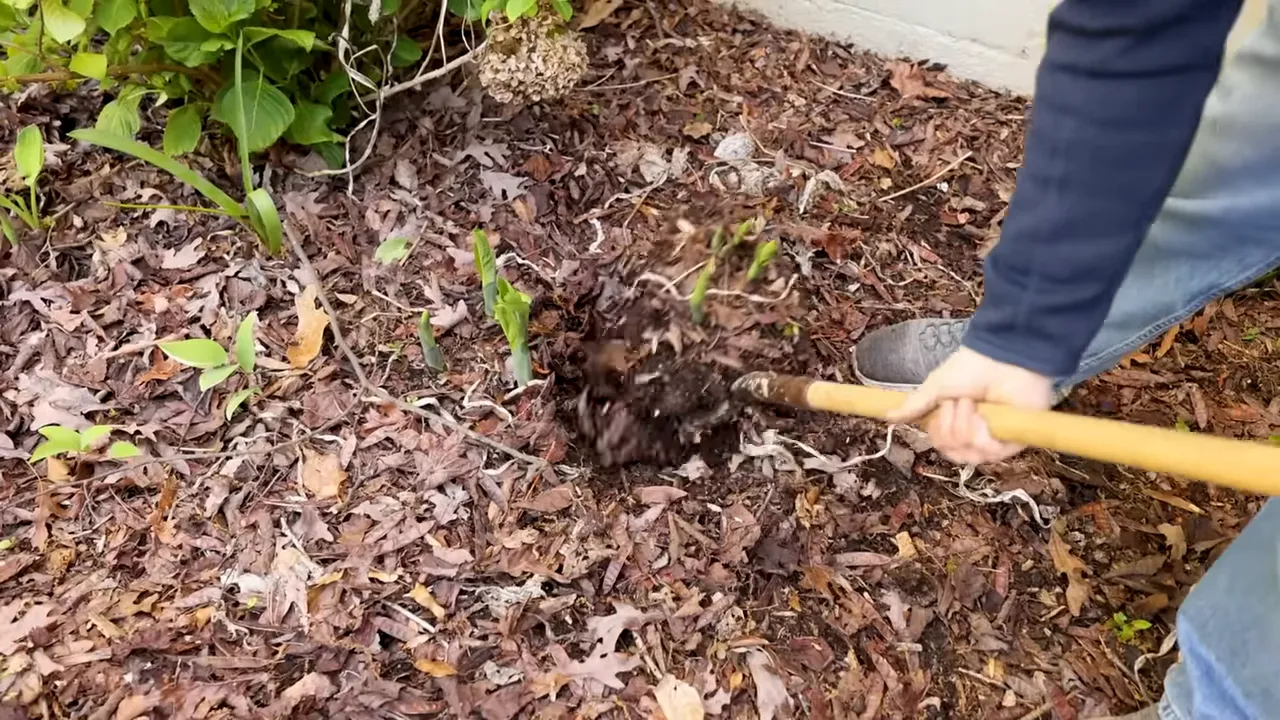
The portion left behind has more space to fill out, and I do not have to lift it, carry it around, or replant it. That is the whole attraction of this method.
Take the removed section to your work area and make the same decision as before. Keep it fairly substantial for planting directly into the garden, or cut it into smaller rooted divisions for containers.
The shoots may be packed closely together, so the cut is not always obvious. Find the best gap you can. I might finish with two vigorous shoots on one division and four on another rather than trying to make perfectly equal pieces.
Choosing a Home for Your New Hostas
Hostas are easy, low-maintenance additions to part-shade and shade gardens. Some of the larger, darker-green varieties can tolerate quite a bit of sun as well, but I would not treat every cultivar as interchangeable.
The range is a big part of their appeal. Hosta sieboldiana ‘Elegans’ makes a large, vigorous clump with substantial leaves. At the other end are little hostas such as ‘Mouse Ears’, along with varieties that have narrow, ribbonlike foliage.
Gold leaves, white markings, stripes, and different leaf textures make them easy to combine with shrubs and other plants. You can contrast heights, foliage colors, flowers, and textures without making the planting complicated. Hostas also flower, and some varieties are fragrant.
‘Rainbow's End’ is one of my favorites for its striking variegation. ‘Striptease’ is a favorite of Steph's. With that much variety available, it is easy to understand how a garden ends up with more than 30 cultivars.
There is one very important limitation: deer love hostas. They can eat them down quickly, so a fenced garden or a space without deer pressure makes growing them a whole lot easier.
Otherwise, dividing them is pretty straightforward. Work with a well-watered plant, keep roots attached to each division, match the division size to its destination, and replant at the original depth. Whether you lift the whole clump or just take a piece from the side, you have an easy way to make more of a good plant.


